Pet Feeder
The pet feeder is an open source project made for all kinds of dogs, being large or small breed, supporting different sizes of food. Our feeder is equipped with a large storage that can have up to 20kg, to guarantee the quality of the food it has a humidity and temperature sensor. Thinking about the health of the neck of large breed dogs, we designed an elevated bowl, and the feeder is adjustable so that you can customize to
better fit your dog height.
better fit your dog height.


User Manual

Components
1. Legs and frame
2. Top of the reservoir
3. Side panels
4. Bottom of the reservoir
5. Screw
6. Base and Motherboard
7. Plate
8. Load cell
9. Power supply
2. Top of the reservoir
3. Side panels
4. Bottom of the reservoir
5. Screw
6. Base and Motherboard
7. Plate
8. Load cell
9. Power supply
How to assemble your pet feeder
1. Start by setting the frame and the legs (1), measure the height of your pet eating
station, and assemble the structure accordingly.
2. Screw the frame (1) into the Base(6) through the loadcell (8).
3. Position the side panels (3) on the sides into the designated slots. If required cut them into smaller pieces to limit the food storage size
4. Cover the storage with the top piece (2).
5. Insert the power (9) in the designated hole under the structure.
Final Assembly

Use Case

The feeder was developed having in mind connectivity as well, the application made for it can be checked here
Structure
The structure should be robust, stable, and adaptive. It has to hold the system and the
food inside, summing up to 20 kg maximum. The height of the food bowl has to be changed by varying the height of the hole system, moving the connection in between the legs where it’s connected.
food inside, summing up to 20 kg maximum. The height of the food bowl has to be changed by varying the height of the hole system, moving the connection in between the legs where it’s connected.

Circuit
The circuit although complex looking, is fairly simple with most components connected in parallel through the I2C connections. And the motor, humidity/temperature sensor are connected using a few digital pins. No prototyping board was needed although a piece of it was used due to the lack of ports GND and 5V.

Base
This is the most important component. It holds the system and connects the most essential parts of the system. Having all the components modular makes this design practical for new implementations.


MotherBoard
The motherboard is a simple structure that allocates some internal space to hold the digital components of the system. By assembling them separately we achieve a simple access that allows for simple upgrades and possible fixing of future problems. In the future, this board could be designed on a PCB with embedded components for cheaper price and scalability

Screen support and Dial
To provide secondary access to the data and the functionalities of the system we implemented an LCD screen with an encoder to help navigate through the menus as intuitively as possible. The screen and Dial have premade cuts in the front of the base. The screen is held in place by a tiny support piece that pushes it forward, fixating it in place. The encoder is simply screwed in and a personalized cap is added.


LoadCell
This component has a very important role in the system once it help calibrate the disposal of the mechanism, keeps track of the meals served, and also registers the amount of food left in the storage. We achieve this by placing a load cell at the bottom of the system and holding it alone. As the whole weight of the system is measured, by knowing the weight of the system we can subtract it from the total weight measured and know the amount of food in the system. A small but strong piece holds one side of the load cell while the other side is screwed into the Base.


Reservoir
The design of the reservoir component became the most challenging because food would get stuck and not fall into the bowl. To solve the crystal structure formed by the big grains we had to enlarge the area that exposes the mechanism so no food would get stuck and by having the screw exposed directly under the food the movement of it would both agitate and push the food forward to the bowl.

The total length of the Screw, gearbox, and motor defined the general dimension of the feeder. After the end of the screw, there is a short space, although simple, it is extremely important once it prevents food from falling of the system when agitated, so only the food pushed by the screw is dispensed.


The reservoir is connected to the base with 4 m4x25mm screws, providing a solid and tight connection between both. The side panels also slide into the base aligned with the reservoir providing a seal to the involvement.

Screw
This component required many iterations to find a solution that would work reliably. Starting with a simple screw shape we found that the grains of food would become stuck in between the edges of the reservoir and the screw. We tested many materials (resin 3d printing, prefabricated screws, hybrid materials, and flexible) they proved to be not feasible in this project due to difficulties in fabrication and price. Trying to avoid the food getting stuck by the end of the screw we noticed that simply decreasing the radius of the screw throughout the length of it proved to be enough to be fully reliable.


Side Panels
The side panels are simple pieces of material that are compatible with food storage with a
thickness of 5mm. Then by cutting them into the dimensions of the system, the height can
be chosen by the client. With the higth of 50cm, the system cand hold 10kg.
thickness of 5mm. Then by cutting them into the dimensions of the system, the height can
be chosen by the client. With the higth of 50cm, the system cand hold 10kg.


Lid
The lid is a direct mirror of the base to keep consistency in the design. It is composed of two parts that screwed together for a simple lid. Then gently fitted into the side panels through the channel in the edges


Main Structure
With 5 pieces of wood its possible to assemble the structure that holds the system. Two parts were designed. The frame is a "H" shaped piece that holds the system directly, it is screwed directly into the load cell. After assembling the frame the next step is to add the legs, you do it simply by screwing them to the frame at the height required by your pet.


Bowl
The desing of the bowl praises the appearance of the system. a simple shallow surface that can hold up to 800g is fixed in place with 4 screws and can be removed for washing. The rounded interior makes it easier to clean once the small particles of the food have a tendency to attach themselves to tight corners.


System Flowchart

LCD Screen
Main Screen

Display Schedule Options

Display Sound Options
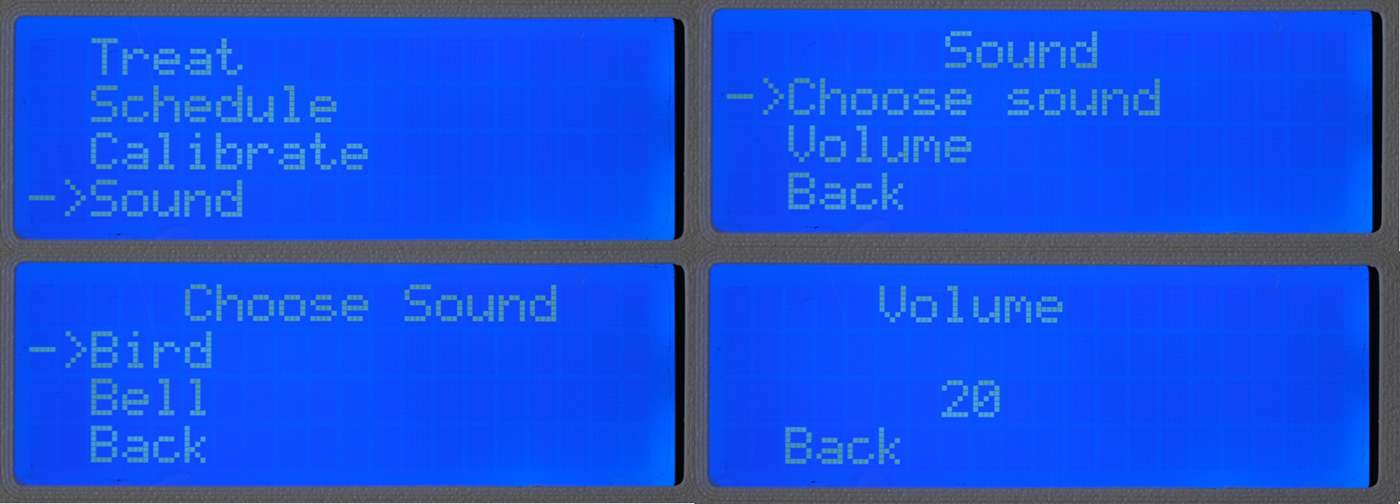
Display Calibration Options

Display Treat

Menu Navigation

The code of the project can be found here


